Installing Kali Linux on VirtualBox gives you a safe playground for penetration testing and ethical hacking. This guide is all about getting Kali Linux up and running inside VirtualBox on your Windows system. Just make sure your Windows machine meets the required specs before diving into the installation.
Sections Covered:
System Requirements
Before installing Kali Linux on VirtualBox, ensure your system meets the following requirements:
- Operating System: Windows 7 or later (32-bit or 64-bit)
- Processor: Intel or AMD processor with virtualization support (Intel VT-x or AMD-V)
- Memory: At least 2GB of RAM (4GB or more recommended)
- Storage: Minimum 20GB of free disk space for the virtual machine and Kali Linux installation
- VirtualBox: Installed and configured on your Windows system (Refer to our guide on how to install VirtualBox on Windows)
Downloading Kali Linux ISO
To install Kali Linux on VirtualBox, it’s important to choose the right version and download method. Here’s how to get started:
Choosing the Right Version: Kali Linux offers several versions tailored to different needs:
- 64-bit: Recommended for most modern computers.
- 32-bit: Suitable for older hardware or systems that do not support 64-bit architecture.
- Apple Silicon (ARM64): Specifically for Apple’s ARM-based processors.
Recommended Version:
- Installer (4.0GB): Complete offline installation with customization options. Recommended for general use.
How to Download:
- Visit the Official Kali Linux Website: Go to the official Kali Linux downloads page.
- Select the Recommended Version: Choose the 64-bit Installer (4.0GB) for a comprehensive installation experience.
- Download Method: Click on the download link for Direct Download or Torrent, depending on your preference. Torrent is recommended for faster downloads, especially for larger files like the Installer.
- Save the ISO File: Choose a location on your computer to save the downloaded Kali Linux ISO file.
Downloading the recommended 64-bit Installer ensures a smooth installation process on your VirtualBox setup.
Setting Up a New Virtual Machine
Now that VirtualBox is installed on your Windows system, follow these steps to set up a new virtual machine for Kali Linux:
- Open VirtualBox:
- Launch VirtualBox from the Start menu or desktop shortcut.
- Create a New Virtual Machine:

- In the VirtualBox Manager window, click on the “New” button.
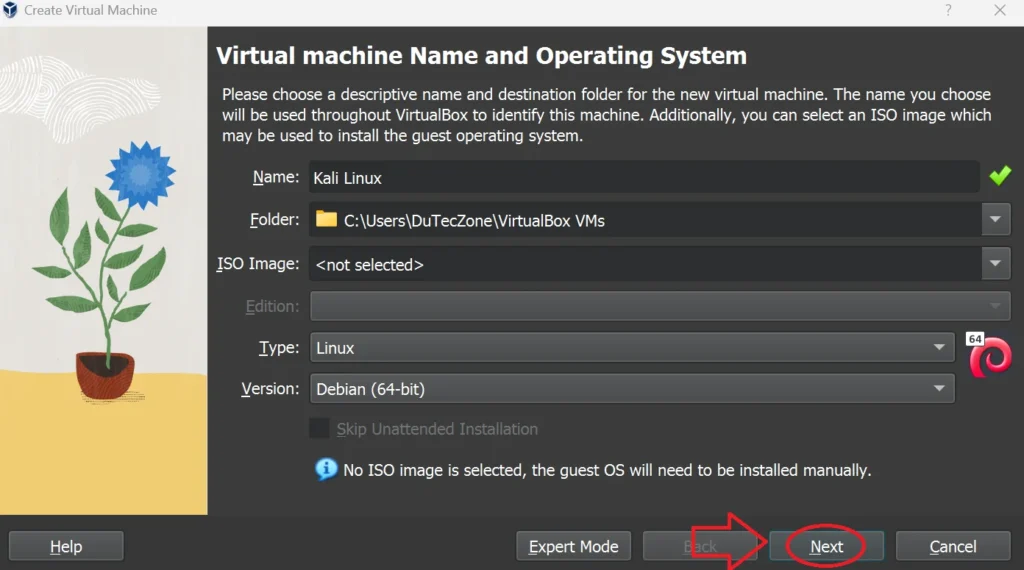
- Name and Operating System:

- Enter a name for your virtual machine, such as “Kali Linux.”
- Choose “Linux” as the Type and “Debian (64-bit)” as the Version. If you downloaded a different version of Kali Linux, select the appropriate version accordingly.
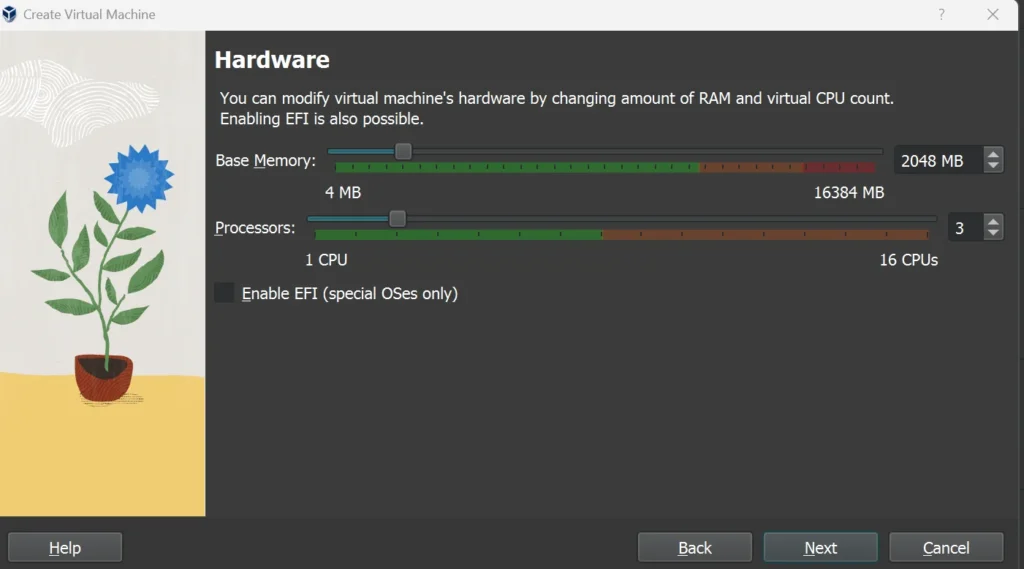
- Allocate Memory (RAM):

- Choose the amount of RAM to allocate to the virtual machine. The recommended minimum for Kali Linux is 2GB, but allocating more RAM can improve performance.
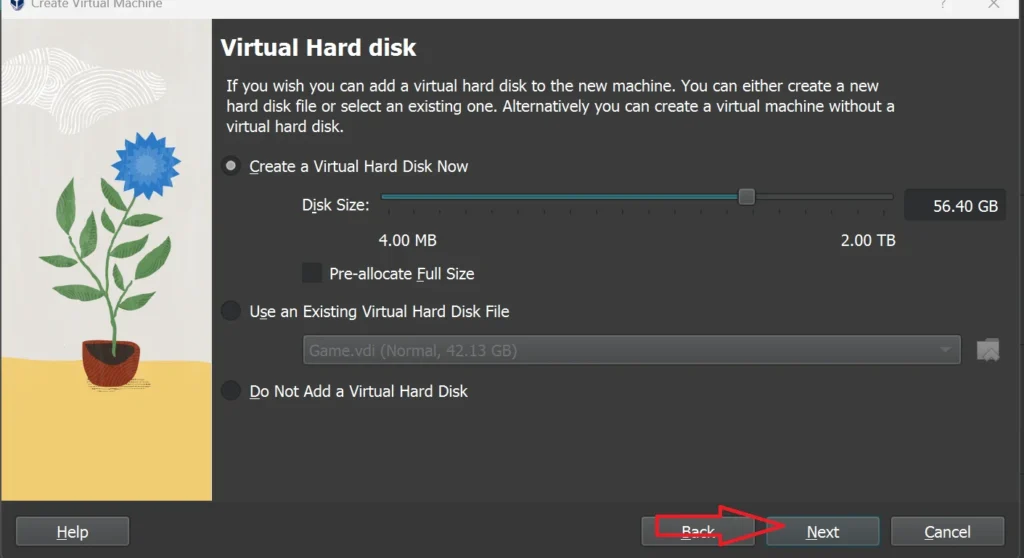
- Create a Virtual Hard Disk:

- Select “Create a virtual hard disk now” and click “Create.”
- Allocate at least 20GB of disk space for your Kali Linux virtual machine.
- Configure Virtual Machine Settings:

- Select your new virtual machine from the VirtualBox Manager and click on “Settings.”
- Configure additional settings such as Display, Storage, Network, and any other preferences you may have.
- Insert Kali Linux ISO:

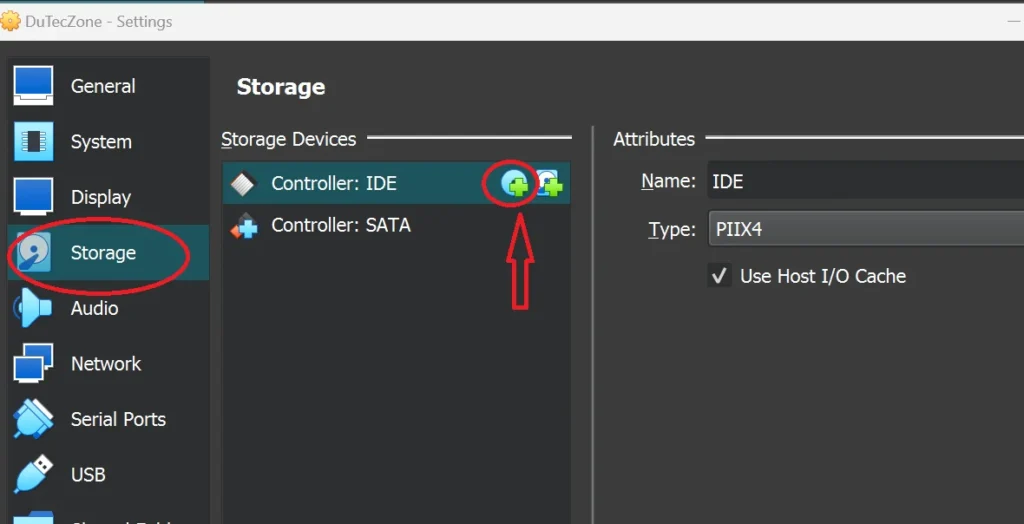
- In the Settings window of your new virtual machine, go to the “Storage” tab.
- Under “Controller: IDE,” click on the disk icon.
- Choose “Choose a disk file” and navigate to the location where you saved the Kali Linux ISO file.
- Select the Kali Linux ISO file and click “Open.”
- Click “OK” to confirm the selection.
You’ve now set up the basics for your Kali Linux virtual machine in VirtualBox. In the next section, we’ll proceed with installing Kali Linux on the virtual machine.
Installing Kali Linux on VirtualBox
Now that you have set up the virtual machine and configured its settings, you’re ready to install Kali Linux. Follow these steps:
- Start the Virtual Machine:
- Select your Kali Linux virtual machine from the VirtualBox Manager.
- Click on the “Start” button to launch the virtual machine.
- Begin Kali Linux Installation:
- The virtual machine will boot from the Kali Linux ISO you inserted earlier.
- Follow the on-screen instructions to start the installation process.
- Choose Installation Method:
- Select your preferred installation method (Graphical Install or Text Install) and press Enter.
- Configure Language and Location:
- Choose your language and location settings for the installation.
- Partition Disks:
- When prompted, choose the disk to install Kali Linux. You can use the entire disk or manually partition it based on your preference.
- Set Up Users and Passwords:
- Create a username and password for your Kali Linux system.
- Install GRUB Boot Loader:
- During the installation, choose to install the GRUB boot loader to the master boot record (MBR) of your virtual hard disk.
- Complete Installation:
- Once the installation process completes, eject the Kali Linux ISO from the virtual machine.
- Restart the virtual machine to boot into your newly installed Kali Linux system.
- Post-Installation Configuration:
- Follow any additional prompts to configure network settings, update software packages, and set up any desired software or tools.
- Verify Installation:
- Log in to your Kali Linux system with the username and password you created during installation.
- Verify that Kali Linux is functioning correctly within VirtualBox.
Installation Successful!
Congratulations on successfully installing Kali Linux on VirtualBox! You’ve now set up a powerful platform for penetration testing, ethical hacking, and exploring cybersecurity tools. This guide has walked you through creating a virtual machine, configuring settings, and seamlessly installing Kali Linux on your Windows system.
VirtualBox allows you to run Kali Linux alongside your main operating system, providing flexibility and security. Whether you’re a cybersecurity professional, conducting security assessments, or simply eager to learn, Kali Linux on VirtualBox offers a safe environment for testing and exploration.
Explore Kali Linux’s comprehensive toolkit and resources to enhance your cybersecurity skills. Refer to the official Kali Linux documentation for further guidance on using its powerful tools and staying updated with the latest developments in cybersecurity.
Thank you for following this guide. Enjoy your journey with Kali Linux on VirtualBox!

