So, you’ve built an awesome website using GitHub Pages, and now you’re ready to make it truly yours with a custom domain. No more username.github.io it’s time to level up with something like YourDomainName.com. Adding a custom domain to your GitHub Pages site is a simple yet powerful way to make your online presence look more professional and personalized.
In this guide, I’ll walk you through the whole process, step by step. Whether you’re a beginner or just need a quick refresher, you’ll have your custom domain set up in no time. Ready? Let’s get started!
Sections Covered:
Prerequisites
Before diving into the process of adding a custom domain to your GitHub Pages site, there are a few things you’ll need to have in place:
- A GitHub Pages Site: You should already have a website hosted on GitHub Pages. If you haven’t done this yet, you’ll need to create a repository with the necessary files and enable GitHub Pages for that repository.
- A Registered Domain Name: You’ll need to purchase a domain name if you haven’t done so already. There are many domain registrars available, such as Hostinger, Namecheap, GoDaddy, or Google Domains, where you can buy your preferred domain.
- Access to Your Domain Registrar’s DNS Settings: To point your domain name to your GitHub Pages site, you’ll need to modify the DNS settings. Make sure you have access to the domain registrar’s control panel where these settings can be adjusted.
With these prerequisites checked off, you’re all set to start the process of connecting your custom domain to your GitHub Pages site.
Setting Up Your Custom Domain
Now that you’ve got everything ready, it’s time to set up your custom domain for your GitHub Pages site. This process involves a few steps, but I’ll guide you through each one in detail.
Accessing GitHub Settings
- Log in to GitHub: First, head over to GitHub and log in to your account.
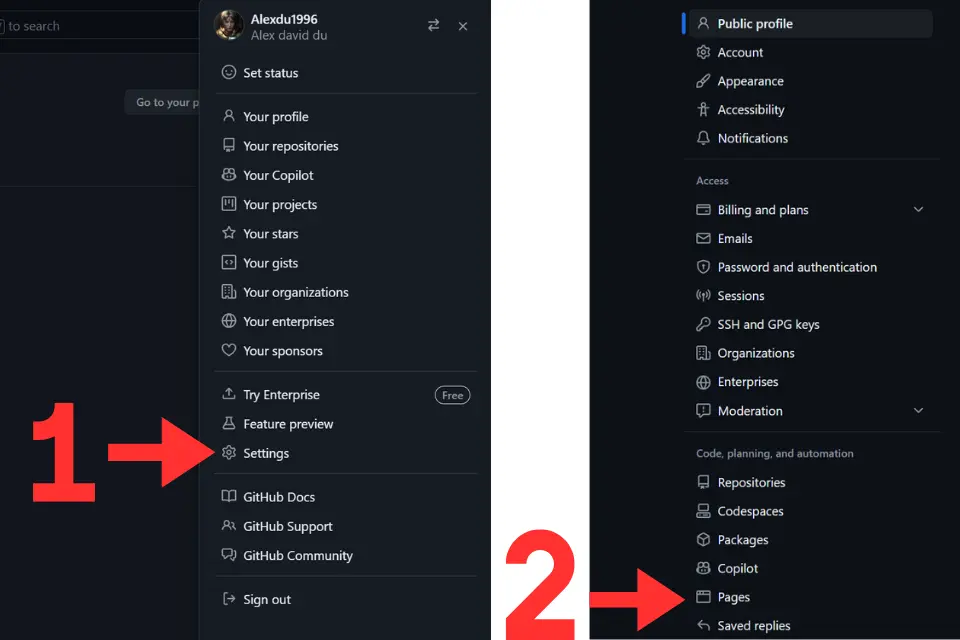
- Navigate to Your Profile: Once logged in, click on your profile picture located in the top right corner of the screen.
- Go to Settings: In the dropdown menu, select “Settings.”
Configuring GitHub Pages
- Find GitHub Pages Settings: Scroll down to the “Code, planning, and automation” section on the left-hand side and look for the “Pages” option. Click on it.
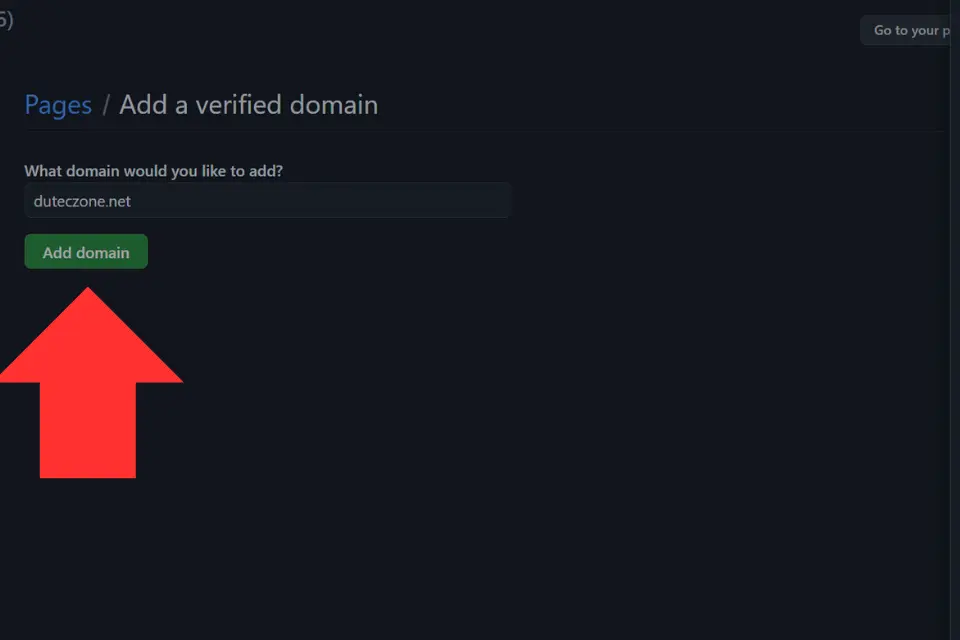
- Verify Your Domain: In the GitHub Pages settings, you’ll see an option to verify your custom domain. Enter your domain name here. Remember, you should only enter
YourDomainName.comno need to includehttps://orwww. - Add Your Domain: After entering your domain, click on the “Add Domain” button. This will prompt GitHub to provide you with instructions on how to configure your domain’s DNS settings.
Setting Up DNS Records
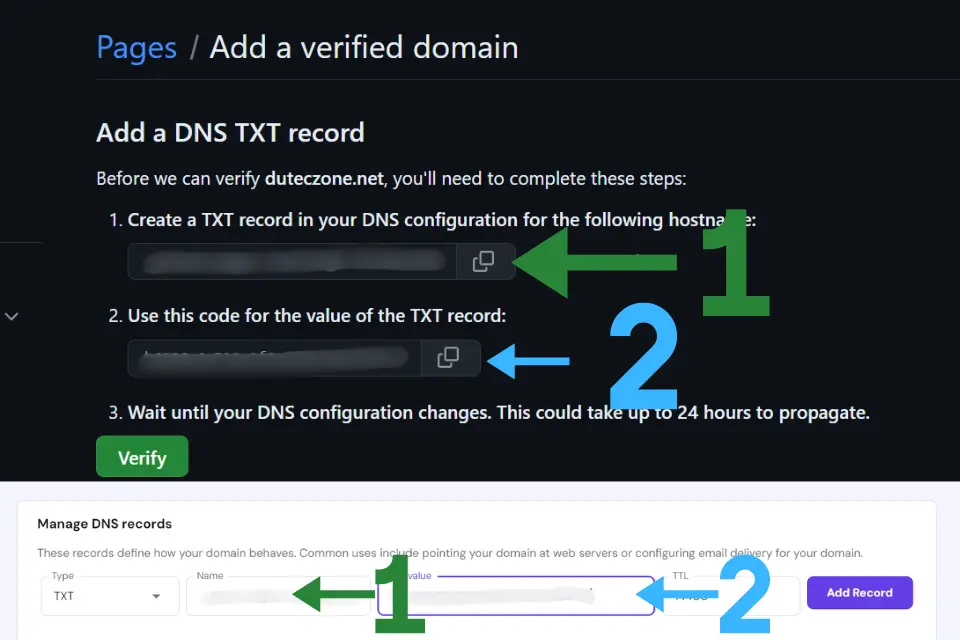
- Create a TXT Record: GitHub will ask you to create a TXT record in your domain’s DNS configuration. It will provide you with a specific hostname and a code for the value of the TXT record.
- Access Your Domain’s DNS Settings: Log in to your hosting provider’s control panel. For example, if you purchased your domain from Hostinger, navigate to the “Domains” section and look for the DNS settings.
- Add the TXT Record:
- Type: Select “TXT” as the record type.
- Name: Copy the “Name” provided by GitHub and paste it into the appropriate field.
- TXT Value: Copy the TXT value provided by GitHub and paste it into the value field.
Once you’ve filled out these fields, click “Save.”
- Verify the TXT Record: Return to the GitHub Pages settings and click “Verify.” This verification process is usually quick, often taking less than 10 minutes. However, it can take longer, depending on your DNS provider.
Pointing Your Domain to GitHub Pages
- Create an ALIAS Record: To point your domain to GitHub Pages, you need to create an ALIAS or ANAME record. For simplicity, we’ll focus on creating an ALIAS record.
- Add A Records:
- Go back to your domain’s DNS settings.
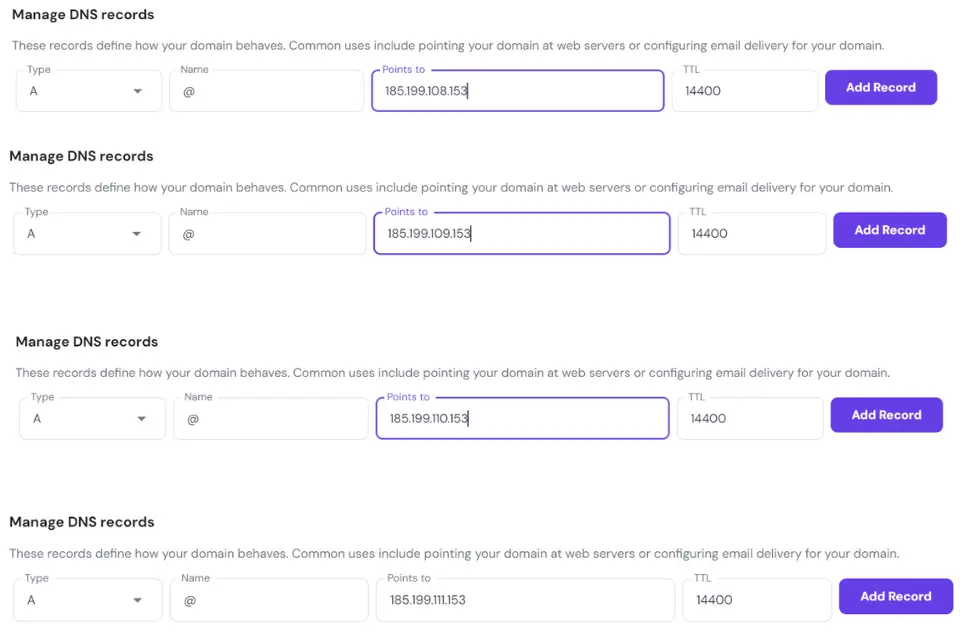
- Look for the option to add “A” records.
- Leave the “Name” field empty or enter
@. - Enter the following IP addresses one by one:
- 185.199.108.153
- 185.199.109.153
- 185.199.110.153
- 185.199.111.153
After adding all four IP addresses, save the changes.
Note: If you prefer to use an ANAME record instead, you can refer to the GitHub guide on managing a custom domain.
Finalizing the Setup in GitHub
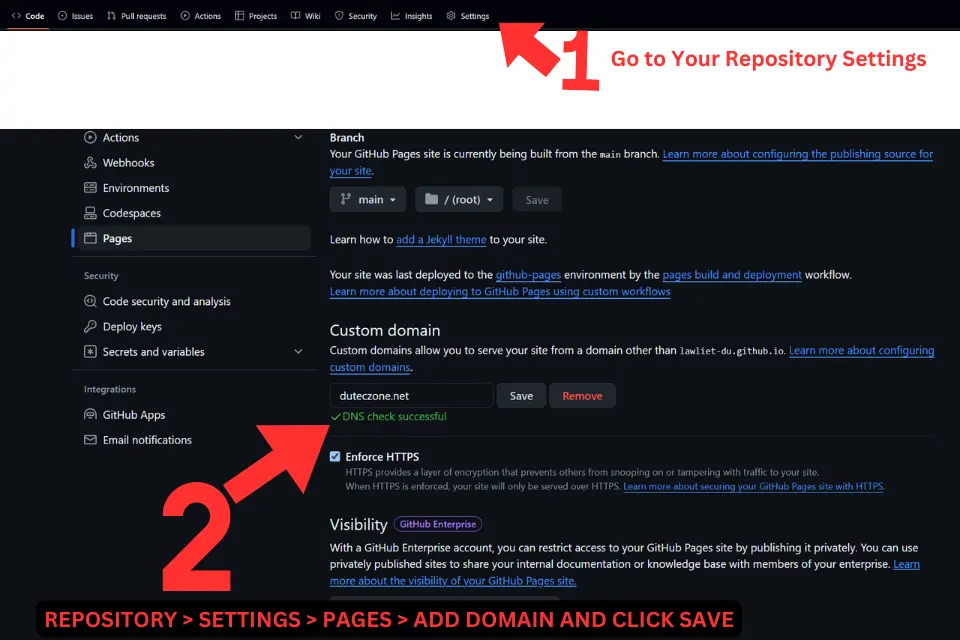
- Return to Your Repository Settings: Go back to your GitHub repository and click on “Settings.”
- Navigate to GitHub Pages: Scroll down and find the “Pages” section again.
- Input Your Custom Domain: You’ll see a field labeled “Custom domain.” Enter your domain name (
YourDomainName.com) here again, withouthttps://orwww. - Save the Changes: Click “Save,” and GitHub will begin checking your DNS settings. If everything is configured correctly, you’ll see a message that says “DNS Check Successful.”
And that’s it! Your GitHub Pages site should now be accessible via your custom domain. If you followed these steps carefully, the transition should be smooth and hassle-free.
Important: Once your domain is successfully verified, make sure to check if the option to “Enforce HTTPS” is clickable. This ensures that your site will automatically use HTTPS for a secure connection. If the option is available, go ahead and enable it to keep your visitors’ data secure. Keep in mind that DNS changes can take some time to propagate, so if you don’t see the option right away, it might just be a matter of waiting a bit longer.
Troubleshooting Common Issues
Sometimes, even when you’ve done everything right, things don’t go as planned. Here’s what to do if you run into problems:
DNS Propagation Not Completed
Symptom: Your custom domain isn’t pointing to your GitHub Pages site yet.
Solution: DNS changes can take some time to propagate across the internet, sometimes up to 48 hours. If your domain hasn’t been verified yet, give it a little more time. If you’ve waited and it still isn’t working, review the steps above to ensure everything was done correctly.
If you’re confident that you followed all the steps and it’s still not working, reach out to your hosting provider for assistance. They can help verify that your DNS settings are correct. You can also check out the GitHub Community, where many users share advice and solutions.
Conclusion
Setting up a custom domain for your GitHub Pages site is a great way to give your project a more professional and personalized touch. By following the steps outlined in this guide, you can easily connect your domain and ensure that your site is accessible under a custom URL like YourDomainName.com.
Remember, the key steps involve configuring your DNS settings correctly, pointing your domain to GitHub’s IP addresses, and verifying your domain through GitHub Pages. If you encounter any issues, don’t hesitate to revisit the setup steps or seek help from your hosting provider or the GitHub Community.
With your custom domain in place, your GitHub Pages site is ready to make a stronger impression online. Enjoy your new web address!

